As many of you may already know, this summer the studio got a big upgrade with a new-to-us Kawai RX-2 grand piano. (More about that here!) My old family piano was reaching the end of it's time as a good teaching instrument, and so I decided to retire it and give it new life by repurposing it into new furniture or art pieces. That process began by needing to take it apart, which in and of itself, is a pretty big project. So today's blog post is taking you behind the scenes on our piano deconstruction project.
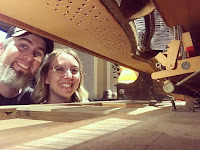
We got off to a good start over the summer, and then had to pause with the beginning of the Fall and less free time. We found some time a weekend in December to finish taking it apart. A large part of the challenge was wanting to keep as much of the wood in tact as we could so that we'd have lots of interesting piano pieces to work with as we start to be creative.
This video is a time lapse that I took and shared on my Instagram stories as we worked on it. And I decided to compile those videos here so you could see the process too! If you've got a piano kid who likes to see how things work, or take things apart, they might enjoy seeing this as well. I know that my inner kid was delighted. I've never gotten to be this hands on with the insides of a piano before (the most I'd dared before was removing a fallboard to fish out a pencil or something that had fallen in), so it was really fun to get to see it from the inside out. I knew that pianos had a LOT of parts that worked together to make the sound, but I had never really considered how many large bolts and screws, and how much glue went into holding it all together.
Here's the time-lapse!
We are close to creating our first new piece from the piano parts, which will be a shelf made from the frame that will take over as our studio book and resource shelf. I have lots of other ideas I've bookmarked, if you'd like to see some of them you can check out my Pinterest board here, or keep scrolling to see some of my favorites below. And stay tuned for a future blog post with more updates about what we end up creating!